If you would like to deploy a React App to AWS S3 and AWS CloudFront, then you can follow this guide.
The following solution creates a React App and deploys it to S3 and CloudFront using the client’s CLI.
It also chains commands so that a React build, S3 sync and CloudFront invalidation can occur with a single command.
Code available at GitHub
https://github.com/ao/deploy-react-to-s3-cloudfront
Target Architecture

Guided Deployment Solution
Create a directory for the application:
mkdir deploy_react && cd $_
Create the React App using create-react-app from npx:
npx create-react-app sample-react-app
(Optional) Open the project in VS Code:
code .
Change directory and run the app:
cd sample-react-app<br>npm start

Install Router
Now we need to install react-router-dom so that we can change routes between pages in our React app.
npm i react-router-dom
Once this is done, we can edit our code before moving onto the deployment steps.
Swap out the code
Open the App.js file under the src directory and replace all the code in the file with the following:
import './App.css';
import React from "react";
import {
  BrowserRouter as Router,
  Routes,
  Route,
  Link
} from "react-router-dom";

const Home = () => {
  return <h2>Home</h2>
}
const About = () => {
  return <h2>About</h2>
}

function App() {
  return (
    <div className="App">

      <Router>
        <div>
          <nav>
            <ul>
              <li>
                <Link to="/">Home</Link>
              </li>
              <li>
                <Link to="/about">About</Link>
              </li>
            </ul>
          </nav>

          <div className="content">
            <Routes>
              <Route path="/about" element={<About />} />
              <Route path="/" element={<Home />} />
            </Routes>
          </div>

        </div>
      </Router>

    </div>
  );
}

export default App;
Open the App.css file as replace it with the following:
ul {
  padding: 0;
}
li {
  display:inline;
  padding: 10px;
}
.content {
  padding: 0 10px;
}
If we run the React app with npm start, we will now see the following:

If we click on About in the navigation, the page changes and shows the About component.

Setting up S3 and CloudFront in the AWS Management Console
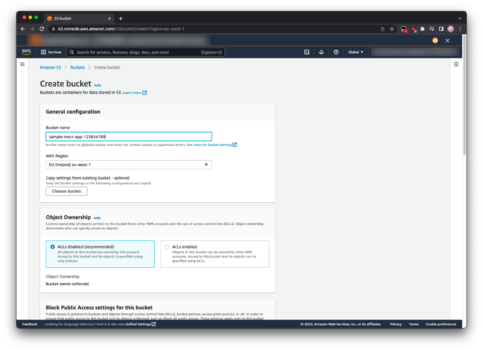
Head over to the S3 console and create a new bucket.
Give it a unique bucket name and click Create bucket.
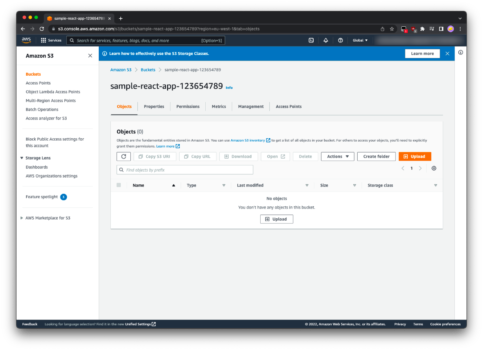
We now have a new bucket, with nothing inside.
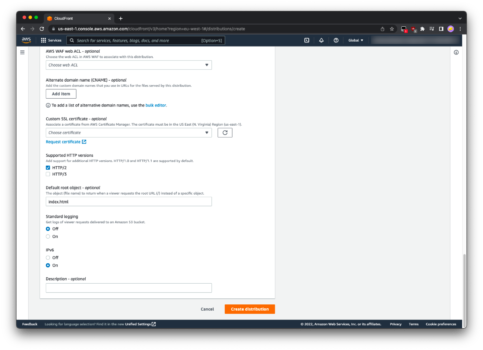
Head over to CloudFront and create a distribution:

Select the Origin domain, which will be the newly created S3 bucket.
Specify a Name. Note that it will create one for you from the Origin domain by default if you don’t specify one yourself.
For S3 bucket access, Choose Yes use OAI, create a new OAI and select Yes for the Bucket policy Update.

Under Default cache behavior, select Redirect HTTP to HTTPS.
Under Settings, specify the Default root object to be index.html
Leave all other fields as is and click Create distribution.
You will now see a distribution being created for you.
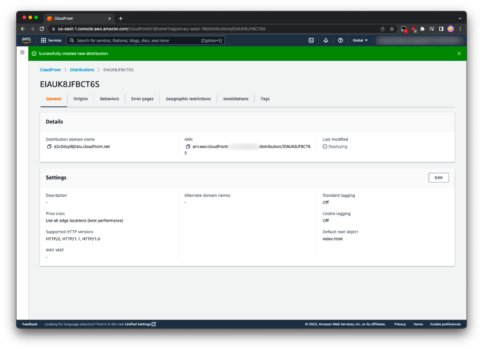
Note that this will take a couple of minutes to get ready,
Setting up the Deployment Scripts
In the package.json file, under src/, locate the following scripts lines:
"scripts": {
    "start": "react-scripts start",
    "build": "react-scripts build",
    "test": "react-scripts test",
    "eject": "react-scripts eject"
},
Here we will add some more options:
We will add a new script called deploy-to-s3 and it will run the following command:aws s3 sync build/ s3://<your_s3_bucket_name>
Note that you can also specify an AWS_PROFILE here as follows if needed:aws s3 sync build/ s3://<your_s3_bucket_name> --profile <profile_name>
Update the scripts section to look as below, but change your own S3 bucket name inplace:
"scripts": {
    "start": "react-scripts start",
    "build": "react-scripts build",
    "deploy-to-s3": "aws s3 sync build/ s3://sample-react-app-123654789",
    "test": "react-scripts test",
    "eject": "react-scripts eject"
},
Now we need to create a build of our React app, so that we can push it’s contents to S3.
To do this, run the following command:npm run build
Then deploy it to S3 as follows:npm run deploy-to-s3

Now if we look in the S3 console, we can see the files that were deloyed:

Setting up CloudFront pages
We now need to setup the CloudFront pages, which we will do through the CloudFront console.

Under the CloudFront distribution, click Create custom error response.
We do this because React is a Single Page Application (SPA) and no physical files exist on the server for the different Routes that we have specified. They are all dynamic.
For example, /about does not exist as a logical path on the drive, or server. So instead, it will be a 404 Not Foundwhen called upon. So therefore, we will tell CloudFront that for all 404 Not Found paths, we want index.html to handle them.
Remember that index.html is the path for where React initializes.
To this end, create a 404 Not Found custom error response, that points to our /index.html file, with a status of 200 OK:

Also create a 403 Forbidden custom error response, that points to our /index.html file, with a status of 200 OK:

Once both have been created, the Error pages should have two (2) entries as follows:

If we don’t create these, then we will get the AccessDenied error when trying to access any of the Routes we specified in the React app, which look like this:

Now instead, we can see the actual Route itself:

Improving the Deployment scripts
Everytime we update the CloudFront distribution, by deploying new files to S3, we need to Invalidate the files.
Head over to the package.json file from before and add another command under the one we just added:
It will look something like this:
aws cloudfront create-invalidation --distribution-id <distribution_id> --paths '/*' --profile <profile_name>
You don’t need to specify the --profile argument, unless you need to.
We can get the Distribution ID from CloudFront itself:

Update this new section as follows, remember to replace your --distribution-id:
"scripts": {
    "start": "react-scripts start",
    "build": "react-scripts build",
    "deploy-to-s3": "aws s3 sync build/ s3://sample-react-app-123654789",
    "invalidate-cloudfront": "aws cloudfront create-invalidation --distribution-id EIAUK8JFBCT6S -- paths '/*'",
    "test": "react-scripts test",
    "eject": "react-scripts eject"
},
If you run that step alone, you will get a verification as follows:
{
    "Location": "https://cloudfront.amazonaws.com/2020-05-31/distribution/EIAUK8JFBCT6S/invalidation/I17X51041BLJHR",
    "Invalidation": {
        "Id": "I17X51041BLJHR",
        "Status": "InProgress",
        "CreateTime": "2022-08-17T18:16:56.890000+00:00",
        "InvalidationBatch": {
            "Paths": {
                "Quantity": 1,
                "Items": [
                    "/*"
                ]
            },
            "CallerReference": "cli-1660760215-662979"
        }
    }
}
Now that we have both the steps we need, let’s create an aggregate command that will tie everything together, so that we only need to run a single command each time:
We will add the following script:
"deploy": "npm run build && npm run deploy-to-s3 && npm run invalidate-cloudfront",
So once we have added it to the scripts block, it will all look like this:
"scripts": {
    "start": "react-scripts start",
    "build": "react-scripts build",
    "deploy-to-s3": "aws s3 sync build/ s3://sample-react-app-123654789",
    "invalidate-cloudfront": "aws cloudfront create-invalidation --distribution-id EIAUK8JFBCT6S --paths '/*'",
    "deploy": "npm run build && npm run deploy-to-s3 && npm run invalidate-cloudfront",
    "test": "react-scripts test",
    "eject": "react-scripts eject"
},
This now means we have a single command to build our React App, sync the files to S3, and invalidate the files in CloudFront, as a chained command.
Testing our Deployment scripts
If we take the current state of the deployed application on CloudFront, it looks like this:

If we open the App.js file and create a new Route:
<Route path="/testing" element={<Testing />} />
Which is added as follows:
<div className="content">
    <Routes>
        <Route path="/about" element={<About />} />
        <Route path="/testing" element={<Testing />} />
        <Route path="/" element={<Home />} />
    </Routes>
</div>
Then add a new component for Testing:
const Testing = () => {
    return <h2>Testing</h2>
}
Then add a new nav item:
<li>
    <Link to="/testing">Testing</Link>
</li>
Now all we need to do to see the changes deployed, is run the following command:
npm run deploy
This will cycle through our steps and produce the following output:
> sample-react-app@0.1.0 deploy
> npm run build && npm run deploy-to-s3 && npm run invalidate-cloudfront


> sample-react-app@0.1.0 build
> react-scripts build

Creating an optimized production build...
Compiled successfully.

File sizes after gzip:

  50.75 kB  build/static/js/main.95dbd789.js
  1.79 kB   build/static/js/787.7c33f095.chunk.js
  301 B     build/static/css/main.58e1094f.css

The project was built assuming it is hosted at /.
You can control this with the homepage field in your package.json.

The build folder is ready to be deployed.
You may serve it with a static server:

  npm install -g serve
  serve -s build

Find out more about deployment here:

  https://cra.link/deployment


> sample-react-app@0.1.0 deploy-to-s3
> aws s3 sync build/ s3://sample-react-app-123654789

upload: build/asset-manifest.json to s3://sample-react-app-123654789/asset-manifest.json
upload: build/static/js/787.7c33f095.chunk.js.map to s3://sample-react-app-123654789/static/js/787.7c33f095.chunk.js.map
upload: build/index.html to s3://sample-react-app-123654789/index.html
upload: build/robots.txt to s3://sample-react-app-123654789/robots.txt
upload: build/manifest.json to s3://sample-react-app-123654789/manifest.json
upload: build/static/js/787.7c33f095.chunk.js to s3://sample-react-app-123654789/static/js/787.7c33f095.chunk.js
upload: build/favicon.ico to s3://sample-react-app-123654789/favicon.ico
upload: build/static/css/main.58e1094f.css.map to s3://sample-react-app-123654789/static/css/main.58e1094f.css.map
upload: build/static/css/main.58e1094f.css to s3://sample-react-app-123654789/static/css/main.58e1094f.css
upload: build/logo512.png to s3://sample-react-app-123654789/logo512.png
upload: build/logo192.png to s3://sample-react-app-123654789/logo192.png
upload: build/static/js/main.95dbd789.js.LICENSE.txt to s3://sample-react-app-123654789/static/js/main.95dbd789.js.LICENSE.txt
upload: build/static/js/main.95dbd789.js to s3://sample-react-app-123654789/static/js/main.95dbd789.js
upload: build/static/js/main.95dbd789.js.map to s3://sample-react-app-123654789/static/js/main.95dbd789.js.map

> sample-react-app@0.1.0 invalidate-cloudfront
> aws cloudfront create-invalidation --distribution-id EIAUK8JFBCT6S --paths '/*'
Now we can refresh the browser and we will see our new Route added and linked to our new TestingComponent as soon as the CloudFront invalidations have completed.