When working with GitHub, you will need to identify yourself. The default way is using your username and password. However, you can also create an SSH key-pair that can be used instead.
By using this technique, you can generate a password and not have to use it each and every time.
You can also reuse your machine’s generated key-pair for other SSH services.
A private and public key is created locally on your machine, and the private key always stays on your own machine. The public key can then be shared with services such as GitHub.
When a connection is made between your machine and GitHub, the keys will be checked against one another and your will be granted access to continue.
It is also not possible to reverse-engineer the cryptography used behind SSH keys. So it’s a nice, simple and safe way to progress.
Generating an SSH key-pair
You will want to start by generating an SSH key-pair
You may already have some keys on your machine, you can tell this by opening the terminal and looking in your user’s .ssh directory. as follows:
$ ls ~/.ssh
If an id_rsa.pub file is shown, then you can continue as is, without having to create a new one.
If you didn’t see anything, then you will need to create a new key-pair as shown below.
Use the below syntax to create a key-pair using the ssh-keygen command-line tool. Make sure to replace your own email address:
$ ssh-keygen -o -t rsa -C "[email protected]"
(Newer versions of ssh-keygen use the -o argument; if you get an error, just remove the -o and try again)
Just follow the prompts, but when asked where to save it, use the default location:
Generating public/private rsa key pair.
Enter file in which to save the key (/Users/username/.ssh/id_rsa):
When presented with Enter passphrase, you can optionally enter a password of your choice, but we will progress with a blank one, so just press Enter. Then confirm with the same input. Enter.
Enter passphrase (empty for no passphrase):
Enter same passphrase again:
Now your key-pair will be created and is available in your ~/.ssh directory.
Your identification has been saved in /Users/username/.ssh/id_rsa.
Your public key has been saved in /Users/username/.ssh/id_rsa.pub.
The key fingerprint is:
02:0a:e4:3b:ca:23:d6:17:ad:7d:f0:68:9d:f0:ad:af [email protected]
The key's randomart image is:
+--[ RSA 2048]----+
|                 |
|                 |
|        . C +    |
|       . o = .   |
|      . G =   o  |
|       o.N . o   |
|       o .+ .    |
|      . o+..     |
|       .+=o      |
+-----------------+
Adding your public key to GitHub
Now that we have a key-pair, we need to get it ready to input into GitHub. Use the cat command-line tool to print out the contents of our public key to the terminal.
$ cat ~/.ssh/id_rsa.pub
The output should look something like this:
ssh-rsa AAAAB3NzaC1yc2EAAAABIwFDf34f879BJGYlPTLIuc9/R5MYiN4yc/YiCLcdBpSdzgK9Dt0Bkfe3rSz5cPm4wmehdE7GkSF231f3IebpwlIl9f/aUHOts9eVnVh4NztPy0iSU/Sv0b2ODQQvF3f3scl8JjAgfWsO3W4iGEe6QwBpVomcME8IU35v5VbylM9ORQa6wvZMVrPECFDE3ItTY8cPWH3MGZiK/74eHbSLKA4PY3gM4GHI45fds43GDg2aTQfWA1rry9JYWEoHS9pJ1dnLqZU3k/8OWgqJrilwFdfr43gp93iu0H8T6+mEHGRQe84Nk1y5fdFDf3636Bl3uQ== [email protected]
Copy this to your clipboard.
Now head over to the SSH Keys section of GitHub, this can be found here: https://github.com/settings/keys

Click New SSH key and enter a name for this key (computer name works), as well as the public key you just copied to your clipboard, into the key section, as below:
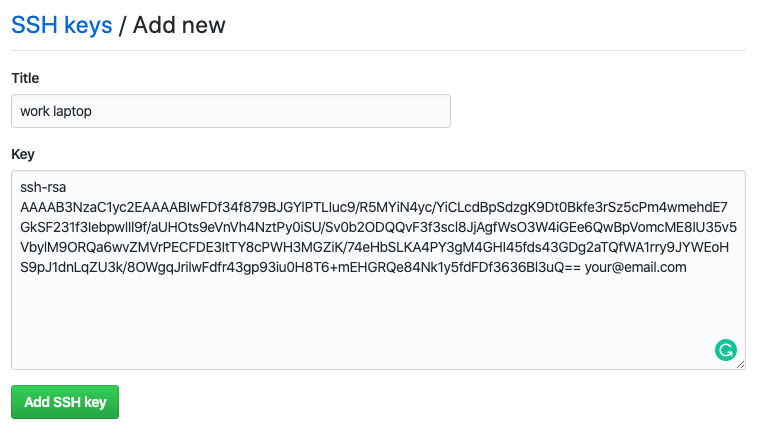
When ready, click Add SSH key to submit the new entry.
If you are prompted for your password, enter it!
Testing and Using your SSH key
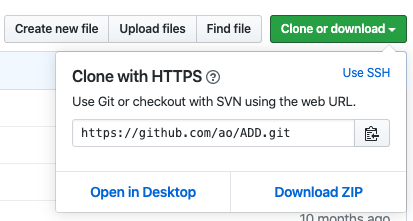
You can now use the Use SSH option when cloning a repository:

This way it will automatically use the private key stored on your computer instead of prompting for a password each time.